TL;DR
A studio microphone converts sound into an electrical signal, but the right choice depends on what you record, the sound of your room, and how you place the mic. Condensers, dynamics, and ribbons each have useful strengths; careful placement and a quiet recording space can matter more than price.
At 11 p.m., you record a vocal take that sounds bright and intimate in your headphones. The next morning, the same track seems thin, harsh, and full of room echo. The microphone did not change overnight; the room, placement, and listening conditions explain much of the difference.

Get audio and creator gear delivered free with Prime
- Fast, free delivery on millions of items
- Prime Video, Amazon Music and more included
- Member-only deals all year
Studio recording microphones turn sound into a signal your recording setup can capture. Choosing one means weighing the source, the room, the microphone’s pickup pattern, and your budget together. This guide explains those choices in plain language, so you can spend less time chasing a famous model and more time making a recording you like.
You’ll learn what condenser, dynamic, and ribbon microphones tend to do well; which specifications deserve your attention; and how a few careful placement changes can improve a bedroom vocal or acoustic guitar. The goal is practical: make a confident choice with the gear and space you have.
Choose among condenser, dynamic, and ribbon microphones based on the source and room; each type has tendencies, not hard rules.
Cardioid, omnidirectional, and figure-eight patterns shape how much room sound a microphone captures.
Move the microphone a few inches and listen on headphones before replacing it; placement often changes tone and room balance.
XLR microphones usually need a preamp through an interface or mixer, while USB models include a digital connection.
Check your microphone’s instructions before enabling 48-volt phantom power, especially when your setup includes a ribbon microphone.
Choose a microphone type that suits your source and room
A studio microphone converts sound into an electrical signal, and each mic type handles sources and rooms a little differently. A condenser often captures fine detail, a dynamic can be forgiving around loud sources or background noise, and a ribbon tends to sound smooth. These are tendencies shaped by a mic’s design, not guarantees: the capsule, tuning, distance, and room all affect the finished sound.
Condenser microphones are common on vocals and acoustic instruments because their designs can respond quickly to subtle changes in sound. That can preserve breath, string detail, and pick attack, but it also means quiet room reflections and computer noise may be more apparent. Many need 48-volt phantom power, supplied by an interface or mixer. A large diaphragm condenser might flatter a soft singer’s voice, while a small diaphragm model is often used to capture the crisp pick attack of an acoustic guitar. If your bedroom has a hard, echoing floor, though, the extra detail may include the room you would rather leave out.
Dynamic microphones are generally rugged and less sensitive to quiet room sounds, particularly when used close to the source. That can help when the recording environment is noisy: putting a dynamic near a guitar amp makes the amp much louder at the mic than traffic or room reflections. The tradeoff is that some dynamic models produce less output than condensers, so the preamp may need more gain; a noisy preamp can then become audible. Imagine recording a loud guitar amp with traffic outside: a dynamic close to the speaker may give you a more focused take than a sensitive mic across the room. A well-placed dynamic can still deliver a detailed vocal.
Ribbon microphones are often valued for a smooth, natural response on brass, strings, some vocals, and guitar amps. Their sound can soften an overly sharp source, but that character is a preference, not a universal improvement. Older or delicate ribbon models need careful handling; modern active designs may be built for more flexible use. Check the manual before connecting unfamiliar equipment or switching on phantom power, since the requirements depend on the microphone’s design.
The useful question is not “Which type is best?” It’s “Which mic helps me capture this source in this room?” A friend tracking a bright voice in a treated booth may love a condenser, while you may get a better result from a dynamic in a lively spare room. The type narrows the options; placement and listening tell you whether the specific mic works. Fit beats category. [1]
As an affiliate, we earn on qualifying purchases.Products Worth Considering

Anker SOLIX C300 DC Portable Power Station with 60W Solar Panel, 288Wh, 300W

Bose TV Speaker (2nd Gen) Compact Soundbar with Bluetooth and HDMI-ARC, Black

Bose QuietComfort Wireless Noise-Cancelling Headphones, Cypress Green
Read the specifications that actually help you choose
Studio recording microphones become easier to compare when you focus on the specifications that affect your recording: polar pattern, frequency response, self-noise, maximum SPL, sensitivity, and proximity effect. Each describes a particular behavior, so its value depends on the sound source and room. Specs help you predict practical limits or narrow a shortlist; they do not capture the whole tone or tell you how a mic will sound on your voice.
The polar pattern describes where the microphone hears sound. Cardioid mainly captures the front and rejects much sound from behind, so it can help keep a computer fan out of a vocal take if the mic’s rear faces the fan. It does not erase room sound: reflections can still reach the front or sides. Omnidirectional captures from all directions and can sound natural in a good room, where room tone is part of the recording, but it gives you less directional rejection when the space is noisy. Figure-eight captures front and rear while rejecting the sides, which can help with a two-person interview if you seat each speaker on one side. That pickup also means sounds behind the mic remain part of the recording.
A frequency-response chart shows how the mic responds across pitches. A rise in the upper midrange might add presence to a dark voice, while a bass lift could add weight; the same changes might make a bright voice harsh or a close recording boomy. The chart is useful for identifying broad tonal tendencies, but it is not a complete sound sample: it does not show how the mic interacts with your source, distance, or room. Self-noise is the mic’s own noise, so it matters more when the desired sound is quiet, like a softly fingerpicked guitar, than when close-miking a snare. Maximum SPL indicates how loud a source the mic can handle before its output becomes distorted. A high limit is useful near a loud amp, but has little bearing on a quiet vocal.
Sensitivity describes output for a given sound pressure; a more sensitive mic is not automatically better. It may let you use less preamp gain, but it does not improve the source-to-room balance: a mic that hears a voice and its reflections together still captures both. Directional microphones can also show the proximity effect: move close, and bass often increases. That can warm a thin voice, but it may turn a close-miked bass-baritone into a boomy blur. The change is useful when you want to shape tone with distance, provided you can keep that distance consistent between takes.
For example, if you are comparing two cardioid mics for a voice, first consider whether the room’s reflections are a problem. Rear rejection and a workable position may matter more than a small difference on a frequency-response chart. Then listen to your own source at the distance you expect to record; that reveals whether the mic’s tonal character and noise floor suit the job. [1]
Improve your recording by moving the microphone first
Microphone placement can change tone, room sound, and the balance between direct and reflected sound more than swapping microphones. Moving closer usually raises the direct sound relative to the room, while changing the angle or position can emphasize different parts of the source and alter which reflections reach the capsule. Start with the mic you already own, monitor through headphones, and move it a few inches at a time while the performer repeats the same phrase. Small moves can take a vocal from boxy to open or bring an acoustic guitar’s pick attack into focus.
Try this simple sequence for a vocal take:
- Find a quiet spot. Turn off noisy fans if you can, and listen for traffic, computer noise, or a refrigerator hum. Lower background noise gives you more room to raise the vocal in the mix without raising distractions alongside it.
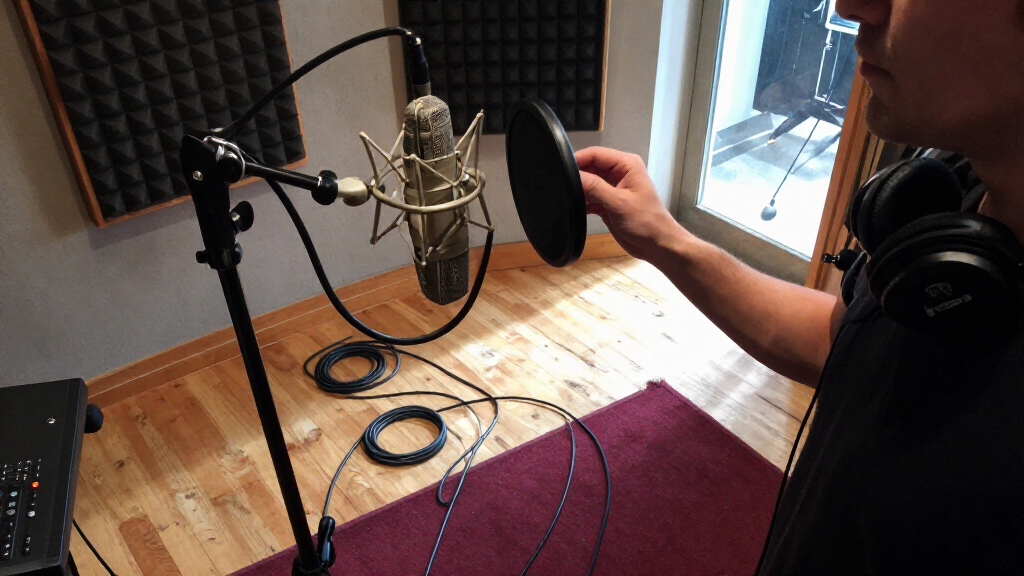
- Start about 6 to 10 inches away from a cardioid mic, with a pop filter between you and the capsule. This gives you a useful place to begin, not a universal rule; a closer position can sound intimate, while a farther one includes more room.
- Record the same line at two or three distances. Listen for room echo, plosives, and bass buildup rather than choosing by volume alone. Matching playback levels helps you judge tone instead of simply preferring the louder take.
- Angle the microphone slightly off the mouth if “p” sounds burst into the recording. Move it closer for a more intimate sound or farther away if the proximity effect makes the voice too bass-heavy. Each adjustment trades one quality for another, so keep the position that best fits the performance.
- Keep the best position repeatable. Mark the stand height or floor position if you need to record another session. Consistent distance makes separate takes easier to edit and keeps their tone from shifting unexpectedly.
Picture a singer tracking in a bedroom, with a bare wall behind the microphone and a bed across the room. A small angle change or a move away from that wall may soften the sharp reflection that makes every syllable sound hard. The bed may absorb some high-frequency energy, but it will not address every reflection or low-frequency buildup; a blanket can reduce some reflections in a pinch, but it will not turn the room into a professional booth.
Good placement is part listening, part patience. The headphones let you hear each change as it happens, and repeating the same phrase makes comparisons more reliable. Move the mic before shopping for another one. [1]
Match the recording chain and accessories to your setup
Your recording chain needs to get sound from the microphone into your software at a usable level. With an XLR microphone, that usually means a cable and a preamp, often built into an audio interface or mixer. The preamp raises the mic’s small signal so your recorder can capture it cleanly; its gain range and noise become more important with a low-output mic or a quiet source. A USB microphone combines the mic and digital connection, which can make it convenient for podcasting, streaming, or a compact home setup.
If you choose a condenser, check whether it needs phantom power—usually 48 volts—and read the manufacturer’s instructions before switching it on. That’s particularly sensible when a setup includes ribbon mics or unusual gear. Phantom power is routine for many modern condenser microphones, but checking first takes only a moment and helps you follow the right procedure for your equipment.
A stand and pop filter can make a bigger practical difference than an accessory with a flashy name. A stable stand keeps the capsule from drifting during a take; even small distance changes can alter level and proximity effect, making vocal takes harder to match. A pop filter helps tame bursts of air from “p” and “b” sounds during close vocals. A shock mount can reduce bumps transmitted through the stand, though it will not remove noise already traveling through the air. If you record an acoustic guitar, you may skip the pop filter and spend your attention on a cable that does not crackle when you shift your chair.
DSP-enabled and hybrid microphones may add headphone monitoring, software controls, or onboard processing. These features can simplify a streaming or solo recording workflow, while an XLR setup gives you more choice of interface and more flexibility for multi-mic recording. Modeling systems also aim to reproduce other microphones’ tonal character, but their usefulness depends on the source, signal chain, and result you hear. Extra controls are helpful when they reduce setup friction; they add little value if they complicate a workflow you already understand.
For a first home vocal setup, a USB mic may reduce setup steps. If you expect to record two microphones at once or change preamps later, XLR and an interface may suit you better. Choose the chain for the work you actually plan to do. [1]
Compare common microphone choices before you buy
The best microphone purchase matches your recording habits, room, and sources; price alone cannot tell you which model will serve you well. Before buying, compare what each setup offers in day-to-day use. The key tradeoff is often between flexibility and simplicity: equipment that solves a real recording problem is useful, while extra options you never use still take up budget and setup time. For example, a singer recording at home may value easy setup and room rejection more than a second pickup pattern they rarely use.
| Choice | Often useful for | Tradeoff to watch |
|---|---|---|
| Large diaphragm condenser | Vocals and detailed studio recording | May reveal room reflections and background noise |
| Small diaphragm condenser | Acoustic instruments and precise transients | Can pick up a lively room clearly |
| Dynamic | Drums, guitar amps, and untreated rooms | May need more preamp gain, depending on the mic and interface |
| Ribbon | Smooth sounds on brass, strings, and guitar amps | Handling and setup requirements vary by design |
| USB or hybrid microphone | Streaming, podcasting, and simple home recording | May offer less flexibility for separate multi-mic equipment |
Suppose you record one speaking voice at a desk, then occasionally interview a guest over a video call. A USB mic can keep the setup tidy because the preamp and digital connection are built in. The tradeoff is that you have fewer ways to expand or replace parts of the chain. If you record a drum kit, an interface with several inputs and multiple microphones may matter more than one mic with built-in software features, because each mic needs its own input and level control.
Before committing to a purchase, listen to recordings made with the microphone on a source like yours, and check current product specifications and prices with the manufacturer or retailer. Products and availability change over time. If possible, borrow or rent a mic for a session. Your voice through your room is a more useful test than a sample recorded in a polished studio, where room acoustics and processing may hide the differences you need to judge. [1]
Get cleaner recordings from an untreated bedroom
You can record useful vocals or instruments in an untreated bedroom, but background noise and reflections can limit the result. Noise competes with the source, while reflections arrive shortly after the direct sound and can make it seem hollow, harsh, or distant. Choose the quietest available spot, listen to the room before recording, and place the mic where the direct sound is clear. Soft furnishings may reduce strong reflections, though they cannot block every noise or fix every room problem.
A sensitive microphone can capture the detail you want and the whir of a computer fan you do not. Try recording a short pause with the mic in position. If you hear traffic, heating, or a high-pitched electrical whine, move the setup, mute the source, or wait for a quieter time. That pause reveals what the mic will add to every quiet moment in the performance. A blanket on a reflective surface might soften a sharp echo; leaving space around the mic can help prevent the recording from sounding boxed in.
Imagine recording a soft acoustic part next to a window facing a busy street. A small diaphragm condenser may pick up the guitar’s crisp string attack, but it will also capture passing cars. Moving to a quieter wall and placing the mic closer can raise the guitar relative to the room noise. The closer position may change the guitar’s bass balance and playing detail, so listen for those effects too. That tradeoff may matter more than changing to another condenser.
Room and microphone choices interact. An omnidirectional mic can sound pleasing in a balanced room, where natural ambience supports the source, but it will hear more of the space than a cardioid mic. A cardioid mic aimed away from the loudest reflection can help, though it will not remove room sound entirely; its directionality is not a substitute for controlling the reflection itself. Each bedroom has its own pattern of hard surfaces, soft furnishings, and noise.
A better room position can be more valuable than a pricier microphone. Before your next purchase, try a quieter corner, a closer mic position, and a short test recording through headphones. Each trial helps you identify whether noise, reflections, or tonal balance is the main limit, so your next adjustment addresses the cause.
Listen back at a comfortable volume before recording the full performance. The room that feels quiet while you sit in it may sound different once the microphone brings its reflections and hum into focus. [1]
Frequently Asked Questions
What microphone is best for recording vocals?
A cardioid condenser is a common starting point for vocals, but the best fit depends on your voice and room. A dynamic may suit a noisy or untreated room better. Try the mic on your own voice before you decide.
Do I need an audio interface for an XLR microphone?
Most XLR microphones need a preamp, which you can usually find in an audio interface or mixer. A USB microphone includes its digital connection and generally does not need a separate interface.
What is phantom power?
Phantom power, usually 48 volts, supplies power through an XLR connection to many condenser microphones. Check the microphone’s documentation before you turn it on, particularly if you use ribbon microphones or unfamiliar equipment.
Can I get a good recording in a bedroom?
Yes. Start in a quiet spot, listen for hum and traffic, and place the mic to reduce strong reflections. Soft furnishings may help with a sharp echo; moving closer to the source can make it louder relative to the room.
How close should I sing to a microphone?
There is no single correct distance. Try around 6 to 10 inches as a starting point for a cardioid vocal mic, with a pop filter, then listen for plosives, room sound, and bass buildup. Moving close can add warmth through the proximity effect.
Does a more expensive microphone always sound better?
No. The sound depends on the microphone’s fit for your source, its placement, your room, and your recording technique. A carefully placed affordable mic can produce a better take than an expensive model in a noisy or echoing spot.
Conclusion
Choose a microphone for the source you record and the room you record in, then give placement a careful listen. A dynamic mic in a quiet corner can beat a costly condenser pointed at a hard wall; a small move can turn a muddy vocal into a clear one.
Before you shop, record a short test from two or three positions with your current mic. Listen for the sound you want, and let that recording—not the price tag—guide your next step.