
This checklist is for home recording creators upgrading a studio setup for voice, music, or other audio projects. It covers the main pieces named here, from getting sound into a computer to monitoring and room treatment.

Get audio and creator gear delivered free with Prime
- Fast, free delivery on millions of items
- Prime Video, Amazon Music and more included
- Member-only deals all year
The sections follow a practical signal path: start with the interface, then consider speakers, microphone, boom arm, acoustic panels, and headphones. Each pick is paired with a short guide to what matters when choosing that kind of gear.
Use it as a room-by-room check, comparing each item with your existing equipment and recording space. Confirm connections, placement, and fit before buying, and prioritize the parts that address your current bottleneck.
USB Audio Interface
An interface is the connection point between recording gear and a computer, so it deserves an early place on an upgrade checklist. The Focusrite Scarlett 2i2 Studio 4th Gen USB-C Audio Interface Bundle is the named pick; check its included components and connection requirements against the setup you already have. Avoid assuming a bundle automatically replaces every cable, stand, or accessory you need.
Before choosing an interface, list the inputs you use at once: a single microphone workflow differs from one that needs several sources connected simultaneously. Check that the available input types match your microphones or instruments, and confirm the computer has a suitable USB-C connection or an appropriate adapter. Also consider where the unit will sit and whether its controls will be easy to reach during recording. Compatibility includes the operating system and your recording software, so review those requirements before committing. A careful check of ports and workflow helps avoid buying a device that fits the desk but not the actual recording routine.
What to look for:
- Count how many sources need to connect at the same time.
- Match input types to the microphones and instruments you plan to use.
- Confirm USB-C compatibility with your computer and available ports.
- Check included bundle components against the accessories you already own.
- Review operating system and recording software compatibility.
Focusrite Scarlett 2i2 Studio 4th Gen USB-C Audio Interface Bundle
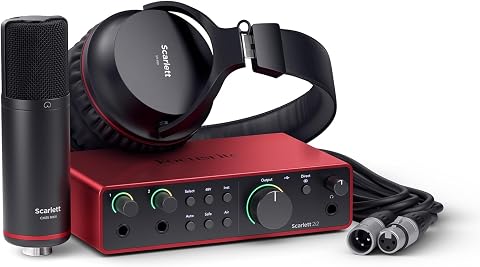
This recording bundle includes a two-channel USB audio interface, CM25 MkIII condenser microphone, SH-450 headphones, and recording software. The interface features a 120 dB dynamic range, 192 kHz maximum sample rate, Auto Gain, Clip Safe, and Air mode for vocals and guitars.
Pros:
- Includes microphone, headphones, and recording software
- 120 dB dynamic range and 192 kHz maximum sample rate
- Auto Gain and Clip Safe help manage recording levels
- Air mode adds presence to vocals and guitars
Cons:
- Availability can vary
Best for: Creators building or refreshing a USB-C recording setup
Not ideal for: Anyone whose computer or workflow needs different connections
Bottom line: Confirm the bundle contents and computer compatibility before making this the center of your setup.
Studio Monitor Speakers
Studio monitors let you hear a mix through speakers, making them a useful complement to headphones. The Yamaha HS5 Powered Studio Monitor, Pair is the listed pick. First check that you have room for two speakers and can position them consistently on a desk or stands. A pair that cannot be placed sensibly may be harder to use well than a setup that fits the room.
Common mistakes include overlooking the connection path from the interface, buying without measuring available space, and expecting speakers to compensate for every room issue. Check what outputs your interface provides and what cables are needed, then plan speaker placement around your listening position. Consider nearby walls, desk reflections, and whether the speakers can be positioned at a similar height and distance. The right fit depends on your room and layout, so measure before purchase and leave enough space to place both speakers securely. If your space is shared or noise carries easily, think through when you can listen at a practical volume and how headphones will complement speaker monitoring.
What to look for:
- Measure desk or stand space for a pair of speakers.
- Match speaker inputs to the interface outputs you have.
- Plan symmetrical placement around your listening position.
- Check cable type and length for your room layout.
- Consider how speaker listening will fit alongside headphone monitoring.
Yamaha HS5 Powered Studio Monitor, Pair

The Yamaha HS5 is a pair of nearfield studio monitors designed for accurate music production and mixing. Featuring a 5-inch woofer and 1-inch dome tweeter, these bi-amplified monitors deliver a flat frequency response from 54 Hz to 30 kHz, ensuring sonic purity without coloration.
Pros:
- Provides accurate and flat sound ideal for mixing and music production
- Bi-amplified design delivers clear high and low frequencies
- Compact size suitable for various studio setups
- High-resolution sound with minimal coloration
Cons:
- May be expensive for casual listeners or beginners
- Requires proper placement for optimal performance
Best for: Producers who have room to position two monitors
Not ideal for: Setups without space for a properly placed speaker pair
Bottom line: Check connections and placement space before adding the pair to your monitoring setup.
Condenser Microphone
A condenser microphone can be central to a recording chain, but choosing one requires attention to the room and the rest of the setup. The Neumann TLM 103 Large-Diaphragm Condenser Microphone with Shockmount is the named pick. Before buying, check that your interface can connect to the microphone as required and that you have a suitable location for the included shockmount. Avoid treating a microphone choice as separate from room conditions: the space and placement affect what the microphone captures.
Think about what you record most often and how much control you have over background sound. Confirm the microphone’s connection and power requirements using its product documentation, then check the interface documentation too. Make sure the shockmount fits your planned stand or boom arm, and leave enough clearance to position the microphone at a comfortable working distance. A frequent mistake is focusing only on the microphone and forgetting mounting and accessories, such as a compatible cable or a pop filter if your recording needs one. Consider how the mic will be stored between sessions and whether its position can be repeated reliably. Good setup compatibility means checking the full chain before purchase, not just the microphone name.
What to look for:
- Confirm microphone connection and power requirements in its documentation.
- Check interface compatibility before connecting the microphone.
- Verify the shockmount works with your planned stand or arm.
- Measure clearance for the intended recording position.
- Identify any needed cable or additional recording accessories.
Neumann TLM 103 Large-Diaphragm Condenser Microphone with Shockmount, Nickel

The Neumann TLM 103 is a cardioid large-diaphragm condenser microphone with low self-noise, high sound pressure handling, and a capsule derived from the U 87. This bundle includes a suspension shockmount, stand mount, wooden storage box, and mount adapters for studio, broadcast, or voiceover use.
Pros:
- Low self-noise
- Handles high sound pressure levels
- Cardioid pattern attenuates sound from the rear
- Includes suspension shockmount and mounting accessories
Cons:
- Availability can vary
Best for: Creators seeking a large-diaphragm condenser microphone
Not ideal for: Rooms or workflows that cannot support the intended mic setup
Bottom line: Verify interface requirements, mounting fit, and room placement as one complete microphone setup.
Microphone Boom Arm
A boom arm helps position a microphone where you need it and can make desk-based recording easier to arrange. The RØDE PSA1+ Professional Studio Boom Arm with Spring Damping, Black is the selected pick. Start with desk compatibility: check the attachment method, desk thickness, edge clearance, and available space around the recording area. Do not assume every clamp or mounting point will suit every desk.
Think through the microphone and shockmount together, since their combined weight and dimensions affect how the arm is used. Confirm the product’s supported load and mounting details from its documentation, then compare them with your microphone setup. Consider cable routing and the arm’s reach so the microphone can move into position without blocking a screen or other equipment. A common buying mistake is measuring only the desk edge while forgetting movement clearance across the full range of motion. Check that the arm can be placed where you want it and stowed when not in use. Plan for a stable clamp location and a cable path that avoids snags; these practical details determine whether the arm suits your routine.
What to look for:
- Check the desk clamp or attachment requirements against your desk.
- Compare the microphone and shockmount setup with the arm’s stated capacity.
- Measure reach and clearance through the arm’s movement range.
- Plan cable routing to avoid snags and interference.
- Confirm there is space to move or stow the arm between sessions.
RØDE PSA1+ Professional Studio Boom Arm with Spring Damping, Black

The RØDE PSA1+ is a professional studio boom arm with internal spring damping for quiet, smooth adjustments during recording. It clamps to desks up to 70mm thick and supports microphones from 0.25kg to 1.2kg, including shock mounts.
Pros:
- Internal spring damping helps reduce creaks and handling noise
- Supports a useful range of microphone weights, including shock mounts
- Integrated cable management keeps XLR cables hidden
- 360-degree rotation provides flexible positioning
Cons:
- Desk clamp may not fit very thin or very thick surfaces
- Load capacity may not support unusually heavy microphone setups
Best for: Desk-based recording with a compatible microphone setup
Not ideal for: Desks that cannot accommodate the arm’s mounting requirements
Bottom line: Check desk fit, microphone capacity, and movement clearance before installing the arm.
Acoustic Foam Panels
Room treatment is a separate part of a recording upgrade from microphones and monitoring. The listed product is ATS Acoustics Sound Absorbing Acoustic Panel 24" x 24" x 4" Beveled Ed. Check the complete product listing for its exact dimensions and mounting details before planning a layout. Avoid buying panels by quantity alone: first identify the area you want to treat and how the panels will fit that space.
Measure the available wall area, note doors and other obstacles, and decide where treatment can be placed without interfering with everyday use. Confirm whether the panels require separate mounting hardware and whether the chosen surface can support that method. A common mistake is assuming that foam panels will solve every sound problem; consider the room, recording position, and the specific reflections or noise you are trying to address. Plan panel placement around your recording position and test the room as you make changes. Check product dimensions carefully, since the listing name may be abbreviated, and ensure the beveled edges and stated thickness fit the intended location. The useful choice is the one that works with your wall layout and practical installation constraints.
What to look for:
- Verify the complete panel dimensions in the product listing.
- Measure the target wall area and account for doors or obstacles.
- Check mounting hardware and surface requirements.
- Plan placement around the microphone and listening positions.
- Match the treatment plan to the room issue you want to address.
ATS Acoustics Sound Absorbing Acoustic Panel 24" x 24" x 4" Beveled Edge (Ivory)

These acoustic panels are designed to improve sound clarity by effectively controlling reverb and echo. Made with a mineral wool core and wrapped in jute burlap fabric, they are suitable for various spaces like studios, offices, and home theaters, offering easy installation and durable construction.
Pros:
- Effective sound absorption with NRC rating of 1.15
- Easy to install with included hardware and template
- Durable, furniture-grade quality with attractive burlap fabric
- Suitable for various residential and commercial spaces
Cons:
- Limited color options (Ivory only)
- May require multiple panels for larger rooms
- Heavy weight (8 pounds) may need sturdy mounting
Best for: Creators planning targeted treatment for a recording room
Not ideal for: Spaces without a suitable mounting location
Bottom line: Measure the wall and confirm installation requirements before planning a panel layout.
Closed Back Headphones
Closed-back headphones provide a way to monitor recordings without relying on speakers, and they can be useful when recording in a shared space. The listed pick is HD 480 PRO Professional Closed-Back Studio Headphones, Black. Before deciding, check connection compatibility with your interface or computer, including the connector and any adapter you might need. Also consider comfort during the length of your typical sessions.
Fit matters: headband adjustment, earcup feel, and how the headphones sit with glasses or other personal needs can affect whether you will use them consistently. Review the product’s specifications for cable details and replaceable or included accessories, rather than assuming they match your existing gear. One common mistake is choosing headphones only for recording and forgetting that listening comfort matters during editing and review too. Consider whether a closed-back design suits the way you record and whether you need to monitor alongside speakers. Check where the headphones will be stored and how the cable will reach your work position. A compatible connection and comfortable fit are the practical starting points for reliable monitoring.
What to look for:
- Confirm the headphone connector works with your interface or computer.
- Check whether an adapter is needed for your setup.
- Consider fit and comfort for your typical session length.
- Review included cable and accessory details in the listing.
- Plan storage and cable reach at your recording position.
HD 480 PRO Professional Closed-Back Studio Headphones, Black
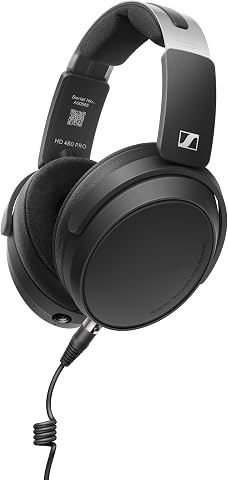
These professional closed-back studio headphones feature German-engineered sound with advanced drivers for clarity and a powerful low-end. Designed for all-day comfort with an adjustable fit and noise reduction, they are versatile for mixing, monitoring, and mobile production.
Pros:
- Accurate, full-spectrum sound with clear low-end
- Comfortable for extended wear with ergonomic design
- Versatile for studio and mobile use
- Durable construction with accessible features
Cons:
- May be more expensive than basic headphones
- Requires careful handling due to detachable cable
- Design may be less portable for on-the-go use
Best for: Creators who want headphones in their monitoring setup
Not ideal for: Listeners whose preferred fit or connection is incompatible
Bottom line: Check fit and connector compatibility before adding these headphones to your recording chain.
Build in a connection-first order: make sure the interface fits your computer and recording needs, then choose the microphone and its mounting setup. Add monitoring that suits your room, and plan acoustic panels around measured wall space and the sound issues you want to address.
You can upgrade in stages by focusing on the current bottleneck in your setup. Check fit, connections, and placement for each item, and let your room and recording routine guide the order. A few careful compatibility checks can make each addition easier to use.
Halloween Picks
halloween
As an affiliate, we earn on qualifying purchases.