
Set up a wireless microphone system by powering the transmitter and receiver, connecting the receiver to your audio equipment, choosing a clean frequency, and testing the sound where you will use it. This guide is for beginners preparing a handheld, lavalier, or headset microphone for a presentation, performance, recording, or event. Allow 20-40 minutes, including a sound check.

Get audio and creator gear delivered free with Prime
- Fast, free delivery on millions of items
- Prime Video, Amazon Music and more included
- Member-only deals all year

Phenyx Pro PTU-7000-4H 4-Channel UHF Wireless Microphone System
- ✔ Channels: 4
- ✔ Frequency range: 530–580 MHz
- ✔ Selectable frequencies: 40 per channel; 160 total
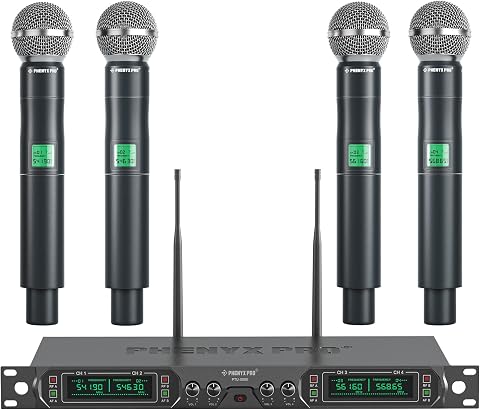
Phenyx Pro PTU-5000-4H 4-Channel UHF Wireless Microphone System with 4 Handheld Microphones
- ✔ Channels: 4
- ✔ Wireless technology: UHF
- ✔ Frequencies: 541.9, 546.3, 561.6 and 568.65 MHz

Phenyx Pro PTU-71-2H Dual UHF Handheld Wireless Microphone System
- ✔ Channels: 2
- ✔ Selectable frequencies: 100 per channel
- ✔ Frequency ranges: Channel 1: 536.57–561.32 MHz; Channel 2: 562.37–587.12 MHz
Difficulty: Beginner | Time: 20-40 minutes
What You’ll Need
Tools & Materials:
- Wireless microphone transmitter and matching receiver
- Fresh batteries or charged rechargeable packs
- Audio cable compatible with the receiver output and mixer, speaker, camera, or recorder input
- Headphones or speakers for checking audio
- Microphone, lavalier, or headset compatible with the transmitter, if separate
Knowledge:
- Basic familiarity with the audio equipment’s input and volume controls
- Ability to mute or lower the audio channel while connecting equipment
Check that the transmitter and receiver are from the same system and can operate on a legal frequency in your location. Read the manufacturer’s quick-start instructions for band, connector, and antenna details. Keep the receiver and transmitter within their rated range, and use fresh batteries for the full event.
Phenyx Pro PTU-7000-4H 4-Channel UHF Wireless Microphone System
For groups that need four handheld microphones and practical frequency coordination, the PTU-7000-4H offers the broadest combination in this lineup. Auto Scan helps locate a usable frequency, while IR Sync transfers settings between receiver and microphone. Each of its four channels has 40 selectable frequencies, giving operators more options than the fixed-frequency PTU-5000-4H when coordinating a setup.The receiver’s four individual XLR outputs let compatible mixers handle each microphone separately, and a mixed 1/4-inch output gives a simpler alternative. That flexibility matters for panels or events where microphones may need different levels. The metal receiver includes rack ears, and microphone mute controls make quick silencing easier. Its claimed range reaches 328 feet in line of sight, but that figure should not be treated as a guarantee in rooms with walls or interference. Like the other systems here, it depends on AA batteries; the supplied information states up to 16 hours of use.Compared with the two-channel PTU-71-2H, this is a better match for larger groups, but it brings more equipment and four microphones to manage. Choose the PTU-5000-4H if frequency scanning and sync features are unnecessary; choose this model when those setup aids and separate outputs justify the extra complexity.
Pros:
- Four channels with Auto Scan and IR Sync for frequency setup and pairing.
- Four individual XLR outputs plus a mixed 1/4-inch output.
- 40 selectable frequencies per channel and a lock function.
- Metal receiver with rack ears; microphones include mute controls.
Cons:
- The stated 328-foot range is line of sight and may not reflect obstructed rooms.
- The handheld microphones require eight AA batteries.
Best for: Event operators, venues and hosts who need four handheld microphones, individual mixer connections and frequency coordination tools.
Not ideal for: Buyers who need only two microphones, prefer rechargeable transmitters, or want a basic fixed-frequency setup.
Bottom line: We recommend the PTU-7000-4H as the most adaptable four-microphone system here for buyers who value frequency setup tools and separate outputs.
“We recommend the PTU-7000-4H as the most adaptable four-microphone system here for buyers who value frequency setup tools and separate outputs.”
Phenyx Pro PTU-5000-4H 4-Channel UHF Wireless Microphone System with 4 Handheld Microphones
The PTU-5000-4H gets four handheld microphones into one system without the scanning and syncing features of the PTU-7000-4H. Its fixed set of four frequencies can make the initial choice straightforward when using one system in a suitable environment. But that same simplicity limits flexibility: the product information says it is not intended for multi-set operation, so we would not choose it where several wireless systems must work together.On the receiver, individual volume controls make it easier to balance speakers at the system, and memory retains the last settings for quicker repeat setup. Four XLR outputs support separate connections to compatible audio equipment; a 6.35 mm jack is also available. The dynamic cardioid microphones are designed to focus on vocals and reduce unwanted pickup, which is useful when several people speak near a sound system. The stated range is up to 260 feet, shorter than the line-of-sight claims for the PTU-7000-4H and PTU-71-2H.We place it behind the PTU-7000-4H because it lacks selectable frequencies and coordination tools, yet it remains a sensible fit for a stable, single-system installation. Remember that it requires an amplifier or speaker for sound output, and its microphones use AA batteries with up to eight hours of stated battery life.
Pros:
- Four handheld microphones with four-channel receiver.
- Individual volume controls and memory for settings.
- Four XLR outputs and a 6.35 mm connection.
- Metal receiver and cardioid microphone cartridges.
Cons:
- Fixed frequencies limit flexibility and are not intended for multi-set operation.
- Requires an amplifier or speaker, which is not included as sound output equipment.
- The stated range is up to 260 feet; battery life is stated as up to eight hours.
Best for: Schools, community groups and small event hosts who need four microphones for one system and value simple receiver controls.
Not ideal for: Users coordinating multiple wireless sets, needing frequency scanning, or expecting the longer stated range of the other two models.
Bottom line: We would choose the PTU-5000-4H for uncomplicated four-mic use where its fixed frequencies fit the environment.
“We would choose the PTU-5000-4H for uncomplicated four-mic use where its fixed frequencies fit the environment.”
Phenyx Pro PTU-71-2H Dual UHF Handheld Wireless Microphone System
When two people need microphones, the PTU-71-2H avoids paying attention to four channels that may go unused. Its dual-channel receiver comes with two handheld dynamic microphones, and Auto Scan helps find a low-interference frequency. Frequency locking can preserve a chosen setup. The system supports up to 16 transmitters operating simultaneously, a notable distinction from the PTU-5000-4H, whose fixed-frequency design is not intended for multi-set operation.Each microphone uses a cardioid pattern intended to favor the speaker in front of it and limit ambient pickup. The metal receiver and replaceable microphone heads may also appeal to users thinking about maintenance over time. The stated line-of-sight range is up to 328 feet, matching the PTU-7000-4H claim, though actual performance depends on obstructions and the installation environment.This is a focused option for duos, presenters or small gatherings, but it cannot provide four simultaneous handheld channels like the PTU-7000-4H and PTU-5000-4H. The supplied details list XLR and 6.35 mm connectivity, though they do not specify four independent XLR outputs as the PTU-7000-4H does. Its handheld microphones run on AA batteries, with up to 16 hours stated. We would choose it for a two-person setup, not as a substitute for a four-channel receiver.
Pros:
- Two handheld microphones with Auto Scan and frequency locking.
- Supports up to 16 transmitters operating simultaneously.
- Metal receiver and replaceable microphone heads.
- Cardioid pickup and a stated range up to 328 feet line of sight.
Cons:
- Only two channels, fewer than either four-microphone alternative.
- The operating range is a line-of-sight claim and can be reduced by obstacles.
- Handheld microphones require AA batteries.
Best for: Two-person presentations, duos and small events that want Auto Scan and support for multiple transmitters.
Not ideal for: Panels or group performances needing four simultaneous microphones, or buyers who want to avoid disposable AA batteries.
Bottom line: We recommend the PTU-71-2H when two microphones are enough and multi-transmitter support matters more than four-channel capacity.
“We recommend the PTU-71-2H when two microphones are enough and multi-transmitter support matters more than four-channel capacity.”
As an Amazon Associate we earn from qualifying purchases.
Before You Start
Place the receiver where it can be seen and reached, with its antennas positioned as the manufacturer recommends. Keep it away from metal barriers, large electronics, and objects that may block the path to the transmitter. Do not turn on the transmitter until you are ready to scan for a frequency; an active transmitter nearby can make the scan less reliable. Mute the audio channel or turn its level down before connecting cables to prevent loud pops.
Step-by-Step Instructions
Step 1: Prepare the microphone and receiver
Install fresh batteries in the transmitter or charge its battery pack. Connect the microphone to the transmitter if it is a separate lavalier or headset model, and tighten the connector without forcing it. Position the receiver near the audio equipment, extend or angle its antennas as directed by the manual, and connect its power supply.
Tip: Check battery type and polarity before inserting batteries. Some transmitters require a specific pack or connector.
Check: The receiver powers on without an error indicator, and the transmitter has enough battery charge for the planned session.
Step 2: Connect the receiver to your audio equipment
Keep the mixer, speaker, camera, or recorder input muted or turned down. Run an audio cable from the receiver output to a suitable input on your equipment. Use the correct cable type for the receiver’s output and the input; check the labels and manuals if they differ. Set the mixer input to the appropriate mic or line level, following the receiver and mixer instructions.
Tip: A receiver’s mic-level output may overload a line-level input, while a line-level output may be too quiet at a mic-level input. Avoid guessing if the output level is unclear.
Check: The cable is fully seated at both ends, and the receiver’s output reaches the intended audio channel.
Step 3: Choose a clear frequency
Turn on the receiver first. Use its scan function, if available, to find an open frequency. Follow the system’s instructions to set that frequency on the receiver, then sync or manually tune the transmitter to match. If you use several wireless systems together, scan and coordinate frequencies for all of them before the event; separate systems can interfere even when each works alone.
Tip: Local TV broadcasts and other wireless equipment can occupy frequencies. Scan at the venue, with nearby wireless systems operating as they will during use. Follow local frequency rules and the manufacturer’s coordination guidance.
Check: The receiver and transmitter show the same frequency or channel, and the receiver’s RF indicator responds when the transmitter is on.
Step 4: Set the microphone and transmitter controls
Turn on the transmitter and keep it in the position it will occupy during use. For a handheld microphone, hold it as you will while speaking or performing. Clip a lavalier microphone at the recommended position on clothing, or fit a headset securely. Set the transmitter input gain or sensitivity using the manufacturer’s guidance, and lock controls if the system has a lock function.
Tip: Keep a lavalier capsule clear of fabric, jewelry, hair, and breath. These can rub, tap, or create wind noise.
Check: The receiver detects the transmitter, and the transmitter remains secure and comfortable in its planned position.
Step 5: Set audio levels with a sound check
Unmute the audio channel and raise the receiver output and mixer or recording input gradually. Ask the speaker or performer to use their real speaking or performance volume, then watch the receiver and mixer meters. Adjust transmitter gain and channel level so normal peaks stay below clipping. Listen on headphones or speakers for clean, steady sound, and keep the main speaker volume low until the channel is under control.
Tip: Set levels using the loudest expected voice or passage, not a quiet test phrase. If a meter clips, lower the stage that is overloading rather than turning up another control.
Check: The voice is clear and at a usable level, meters do not show clipping, and the sound has no persistent hiss, crackle, or distortion.
Step 6: Test coverage and feedback risk
Walk through the full area where the microphone will be used while speaking. Keep the receiver antennas unobstructed and listen for dropouts, noise, or sudden level changes. If using speakers, position the microphone behind or to the side of them where practical, then raise the speaker level gradually while listening for a ringing tone.
Tip: A strong RF indicator at the receiver does not guarantee clean audio. Check the sound at the farthest point and in the actual room layout.
Check: The signal stays audible throughout the planned area, and the speakers remain free of feedback at the required working level.
Step 7: Secure the setup and confirm operation
Route cables where people will not trip over them, and secure them if needed. Keep spare batteries nearby. Confirm that the transmitter is on the correct channel, the receiver is connected to the intended audio input, and the channel is unmuted for use. Before the session, tell the user how to hold or wear the microphone and where to return it afterward.
Tip: If the system has a mute switch, explain its position and check it before the event begins.
Check: A final test at normal use distance produces the same clean sound, and the transmitter, receiver, cable, and audio channel are all ready.
Common Mistakes to Avoid
- Using a frequency that works during setup but conflicts with other equipment at the venue. — Scan at the location with nearby wireless systems active, and coordinate frequencies when using multiple systems.
- Connecting a mic-level output to a line-level input, or the reverse, without checking levels. — Read the output and input labels or manuals, select the matching input setting, and bring levels up gradually.
- Setting gain with a quiet test voice and getting distortion during the actual presentation or performance. — Ask the user to speak or perform at the loudest expected level while you watch the meters.
- Blocking the radio path by placing the receiver behind a rack, wall, or metal object. — Place the receiver in an open position and test coverage across the full working area.
Troubleshooting
Problem: The receiver does not detect the transmitter.
Solution:
Check that both units are powered, the transmitter battery is charged, and both units are tuned to the same frequency or channel. Re-sync them if supported. Move the transmitter closer to the receiver and confirm that the transmitter is not muted or locked in a way that prevents operation.
Problem: Audio cuts out when the user moves around.
Solution:
Move the receiver to a clearer, more central position, raise or re-angle its antennas as directed, and remove objects blocking the path. Scan for a cleaner frequency and retest at the farthest point. Check that the transmitter antenna is not covered or damaged.
Problem: The signal is present but the audio is distorted or too loud.
Solution:
Lower the transmitter input gain if the receiver or mixer meters clip at the source. Check that the receiver output level matches the mixer input setting, then reset levels gradually with a real sound check.
Problem: The audio is weak, noisy, or has a persistent hum.
Solution:
Raise the correct input gain in small increments, check the cable and connectors, and replace or recharge the transmitter batteries. Try another compatible cable or input to isolate the fault. Keep audio cables away from power supplies and electrical equipment where practical.
What Success Looks Like
The transmitter and receiver are tuned to the same clear frequency, the receiver shows a stable radio link, and the connected audio equipment receives clean sound at a usable level without clipping. The microphone continues working throughout the intended coverage area, and the speaker system does not feed back at the required volume.
Next Steps
Keep spare batteries and the system’s frequency details with the equipment. After use, mute the channel, turn off the transmitter and receiver, disconnect cables by their plugs, and recharge or remove batteries according to the manufacturer’s instructions. Repeat the scan and sound check when you move to a new venue, add wireless systems, or notice interference.
Frequently Asked Questions
Can I use any wireless microphone with any receiver?
No. The transmitter and receiver must be designed to work together, and they may need to share a compatible frequency band, channel plan, and system protocol. Check the manufacturer’s compatibility information before connecting them.
How far can I move from the receiver?
The usable distance depends on the system, venue, antenna placement, and obstructions. Use the manufacturer’s range as a guide, then walk-test the full area where the microphone will be used. Walls and people can reduce coverage.
Should I scan for a frequency before or after turning on the transmitter?
Scan with the receiver before turning on the transmitter, unless the manufacturer specifies another process. Then sync or tune the transmitter to the selected frequency and confirm that the receiver detects it.
Why does the microphone work during rehearsal but cut out during the event?
Other wireless equipment or audience devices may change the radio environment, and people or objects may block the signal path. Scan and test at the venue, keep the receiver in an open position, and repeat the coverage walk with the room arranged for the event.