Set up a studio microphone for streaming by connecting it to your computer or audio interface, positioning it, and adjusting your recording settings. This guide is for beginners using a USB or XLR microphone who want clear voice audio in streaming software. Allow 20-40 minutes for setup and a test recording.

Get audio and creator gear delivered free with Prime
- Fast, free delivery on millions of items
- Prime Video, Amazon Music and more included
- Member-only deals all year

Logitech Blue Yeti USB Microphone, Blackout
- ✔ Microphone type: USB condenser
- ✔ Capsule array: Three capsules
- ✔ Pickup patterns: Cardioid, omnidirectional, bidirectional, stereo

FIFINE AmpliGame AM8 USB/XLR Dynamic Microphone for Gaming and Streaming
- ✔ Microphone type: Dynamic
- ✔ Connectivity: USB, XLR
- ✔ Polar pattern: Unidirectional cardioid

ZealSound K66 USB Podcast Microphone with Noise Reduction, Gain and Mute Controls
- ✔ Microphone type: USB condenser
- ✔ Pickup pattern: Cardioid
- ✔ Frequency response: 40 Hz–18 kHz
Difficulty: Beginner | Time: 20-40 minutes
What You’ll Need
Tools & Materials:
- USB microphone and USB cable, or XLR microphone, XLR cable, and audio interface
- Computer with streaming software installed
- Headphones
- Mic stand or boom arm and microphone clip
- Pop filter or foam windscreen
Knowledge:
- Basic ability to connect a device to a computer
- Basic ability to open audio settings in streaming software
Check whether your microphone uses USB or XLR before you begin. An XLR microphone needs an audio interface or mixer with a microphone input. Keep the microphone, interface, and computer powered off while connecting XLR cables. Do not turn on phantom power unless your microphone requires it; check its manual first.
Logitech Blue Yeti USB Microphone, Blackout
The Blue Yeti takes the top spot because it gives streamers more ways to shape a recording setup than the other two microphones. Its three-capsule design supports four pickup patterns: cardioid for a solo voice, bidirectional for two people facing each other, omnidirectional for sound from around the mic, and stereo for a wider recording. That range is most useful when a creator streams different formats or records interviews as well as gameplay commentary. For a fixed solo desk setup, though, we may not need all that choice.During a stream, the Yeti keeps key adjustments close at hand. Instant mute, gain, pattern selection, and zero-latency headphone monitoring make it easier to adjust without relying only on software. Compared with the FIFINE AM8, it favors flexibility and condenser pickup options over a dynamic mic with a USB-to-XLR connection path. Compared with the K66, its strongest distinction is the choice of patterns rather than extra echo or broad mobile-device compatibility.We should account for the setup tradeoff: Logitech G HUB is required for full functionality, so the plug-and-play promise does not cover every feature by itself. Its included desktop stand also makes it easy to start, though a dedicated stand or arm may suit a carefully arranged streaming desk better. This is our best all-rounder when adaptability and direct controls matter more than XLR expansion.
Pros:
- Four pickup patterns suit a wider range of recording and streaming setups.
- Onboard mute, gain, pattern, and headphone controls support live adjustments.
- Zero-latency monitoring helps us hear the microphone while speaking.
- Desktop stand and USB setup offer a straightforward starting point.
Cons:
- Full functionality requires Logitech G HUB.
- Its pattern flexibility may be unnecessary for a fixed solo streaming setup.
- USB connectivity does not provide the AM8’s listed XLR expansion option.
Best for: Streamers who record solo content and occasional interviews or other formats that benefit from selectable pickup patterns.
Not ideal for: Creators who want a dynamic microphone with XLR connectivity, or who prefer not to install companion software for full functionality.
Bottom line: Choose the Blue Yeti when we want one streaming microphone that can adapt to several recording formats and offer direct control at the desk.
“Choose the Blue Yeti when we want one streaming microphone that can adapt to several recording formats and offer direct control at the desk.”
FIFINE AmpliGame AM8 USB/XLR Dynamic Microphone for Gaming and Streaming
The FIFINE AmpliGame AM8 is the choice for streamers who want a focused cardioid dynamic microphone and a way to move from USB to XLR later. Its unidirectional cardioid pattern is designed to favor sound from the front, which suits a speaker positioned close to a desk mic. Compared with the Blue Yeti, the AM8 gives us fewer recording patterns, but its dynamic design and XLR connection make it a different kind of fit for a dedicated streaming position. The K66 is also cardioid, but it is a USB condenser rather than a USB/XLR dynamic mic.Over USB, the AM8 includes useful live-session features: tap-to-mute, headphone monitoring, gain and volume controls, and RGB lighting. These make it more than a basic microphone when we want quick adjustments while gaming or streaming. The XLR option gives us a connection for an audio interface or mixer, but there is a clear mode change: the listed USB controls and RGB lighting are inactive over XLR. We also need to supply the XLR cable separately.The AM8 ranks behind the Yeti because it is less adaptable across recording formats and its richer control set depends on USB. Still, for someone who expects to build around an interface, it offers a sensible bridge: start with USB, then use XLR when the rest of the setup is ready. Built-in 3/8-inch and 5/8-inch threads help it fit common stands, though a stand is not listed among the included accessories. Pick it for dynamic cardioid capture and connection choice, not for four-pattern versatility.
Pros:
- USB and XLR connectivity support a simple setup now and an interface-based setup later.
- USB mode includes tap-to-mute, headphone monitoring, gain, and volume controls.
- Cardioid dynamic design suits a focused, front-facing streaming position.
- Built-in 3/8-inch and 5/8-inch threads fit common microphone stands.
Cons:
- XLR cable is not included.
- RGB lighting and the listed USB controls are inactive over XLR.
- Its single cardioid pattern offers less recording flexibility than the Blue Yeti.
Best for: Streamers who want a cardioid dynamic microphone for a close desk setup and may add an XLR interface or mixer.
Not ideal for: Buyers who need several pickup patterns, expect USB controls to work over XLR, or want an XLR cable included.
Bottom line: Choose the AM8 when a dynamic cardioid mic and a future XLR connection matter more to us than multiple pickup patterns.
“Choose the AM8 when a dynamic cardioid mic and a future XLR connection matter more to us than multiple pickup patterns.”
ZealSound K66 USB Podcast Microphone with Noise Reduction, Gain and Mute Controls
The ZealSound K66 makes the most sense when our streaming setup reaches beyond a Mac or PC. Its listed compatibility includes Windows, Mac, PS4, PS5, tablets, and compatible phones, with USB-C and Lightning adapters included. That gives it a practical edge over the Yeti’s listed Mac and PC compatibility and makes it a straightforward candidate for creators who record from more than one kind of device.Its cardioid condenser design keeps the pickup pattern simple, while the controls cover gain, headphone monitoring, echo, and mute. The 3.5 mm headphone jack and zero-latency monitoring let us listen to the microphone directly. Echo control can be useful for shaping a voice effect in the moment, but it is a more specific feature than the Yeti’s pattern selection or the AM8’s XLR connection. The K66 is USB-only, so it does not offer the AM8’s route to an audio interface through XLR.The seller describes a noise reduction mode, but no independent test results are provided here; we should treat that as a claimed feature rather than assume it will solve a noisy room. That uncertainty is why the K66 ranks third despite its broad device list and accessible controls. It is a capable convenience pick for compatible devices, while the Yeti better suits varied recording formats and the AM8 better suits a dynamic USB/XLR streaming rig. Choose the K66 when compatibility and direct controls lead our checklist.
Pros:
- Listed compatibility spans computers, consoles, tablets, and compatible phones.
- Includes USB-C and Lightning adapters for supported devices.
- Gain, monitoring, echo, and mute controls are available on the microphone.
- Zero-latency monitoring uses a built-in 3.5 mm headphone jack.
Cons:
- Noise reduction behavior and sound quality are seller-described without independent test results provided.
- USB connectivity does not offer the AM8’s XLR expansion path.
- Its single cardioid pattern is less adaptable than the Blue Yeti’s four patterns.
Best for: Creators who stream or record across a computer, console, tablet, or compatible phone and want included connection adapters.
Not ideal for: Buyers seeking XLR connectivity, multiple pickup patterns, or independently supported evidence for noise reduction performance.
Bottom line: Choose the K66 when multi-device compatibility and onboard echo and monitoring controls matter more to us than XLR or pattern choice.
“Choose the K66 when multi-device compatibility and onboard echo and monitoring controls matter more to us than XLR or pattern choice.”
As an Amazon Associate we earn from qualifying purchases.
Before You Start
Choose a quiet room and silence nearby alerts, fans, or appliances where possible. A studio microphone can pick up room echo, keyboard noise, and computer fans more clearly than a headset microphone. Put the microphone on a stable stand and leave space to move it without hitting the desk. If you use speakers, switch to headphones during setup to prevent audio feedback.
Step-by-Step Instructions
Step 1: Connect the microphone
For a USB microphone, connect its cable directly to a computer USB port and wait for the operating system to recognize it. For an XLR microphone, connect one end of the XLR cable to the microphone and the other to the interface’s microphone input. Connect the interface to the computer, then power it on. If the microphone needs phantom power, confirm its manual specifies it and activate the interface’s 48 V switch only after the connections are secure.
Tip:A direct computer USB port can be more reliable than an unpowered hub. If you use a hub, connect it to its own power supply.
Check: The computer lists the microphone or audio interface as an available input device.
Step 2: Mount and position the microphone
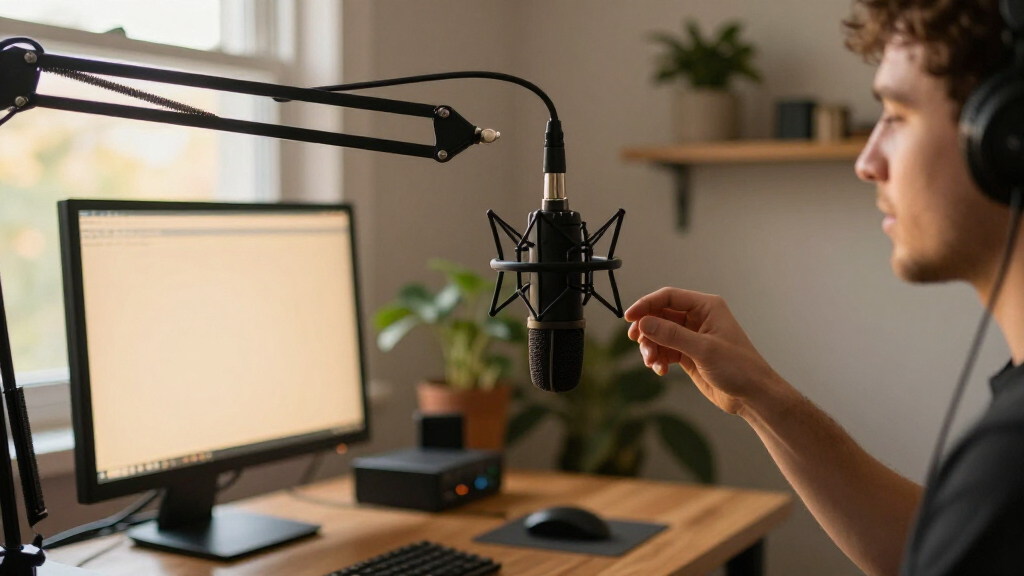
Attach the microphone securely to its stand or boom arm. Check the microphone’s pickup direction: speak toward the front or side marked by the manufacturer, since some models do not capture sound from the end. Position it about 10-15 cm (4-6 inches) from your mouth, slightly off to one side, and aim it toward your mouth. Fit a pop filter between your mouth and the microphone.
Tip:Keep the microphone close enough to capture your voice clearly, but far enough away that you do not hit the pop filter when speaking.
Check: You can speak in a normal posture without leaning toward the microphone, and the microphone has a clear line of sight to your mouth.
Step 3: Select the input device
Open your computer’s sound settings and set the microphone or interface as the recording input. Then open your streaming software, add or select a microphone input, and choose the same device there. Disable or mute other microphone sources to prevent doubled audio or accidental capture from a laptop mic.
Tip:Some programs keep using the input device selected when they started. If the microphone does not appear, close and reopen the streaming software after connecting it.
Check: Speaking into the microphone makes the input meter in your operating system or streaming software move.
Step 4: Set the input level
Start with the microphone’s gain control low or at its default setting. Speak at your usual streaming volume and raise the input level gradually. Watch the streaming software’s audio meter while speaking: aim for ordinary speech to peak around -18 to -10 dBFS, with louder words staying below 0 dBFS. If the meter reaches the red zone or stays at the top, lower the microphone or interface gain.
Tip:Digital clipping sounds harsh and cannot be repaired by lowering the volume afterward. Leave headroom for excited speech, laughter, or sudden loud reactions.
Check: Your normal speech produces a steady meter signal, while louder phrases do not hit 0 dBFS.
Step 5: Set monitoring and recording format
Put on headphones and enable microphone monitoring if your software or interface supports it. Keep the headphone volume comfortable, then speak and listen for distortion, a hollow echo, or distracting delays. In your streaming software, choose the microphone’s supported sample rate; 48 kHz is common for streaming. Set the same rate in the operating system or interface software if those settings are available.
Tip:Monitoring through the streaming application may add delay. If your interface offers direct monitoring, use it to hear your voice with less latency.
Check: You can hear a clean voice signal in your headphones without feedback, and the software accepts the selected audio format.
Step 6: Reduce room and handling noise
Record a short test while speaking at your normal distance. Listen for echo, desk bumps, keyboard clicks, and plosive bursts from sounds such as “p” and “b.” Move the microphone closer if your voice sounds distant, angle it slightly away from direct breath, and tighten loose stand joints. Move noisy devices farther away or reduce their fan speed if practical. Add soft furnishings nearby if the room sounds strongly echoey.
Tip:Do not point the microphone directly at a noisy keyboard or computer fan. Small changes in angle can reduce unwanted sound without lowering your voice level.
Check: The test recording makes your voice easy to understand, with no strong echo, bumps, or breath blasts.
Step 7: Save and test the streaming setup
Save your audio settings, then make a one-minute test recording or start a private stream. Speak at your usual volume, pause, and say a few louder phrases. Play the recording back through headphones. Confirm the correct microphone is active, the voice stays clear, and the meter does not clip. If the recording sounds too quiet or harsh, adjust gain in small increments and record another short test.
Tip:Keep the microphone position and speaking distance consistent between tests. Changing both position and gain at once makes it harder to identify what improved the sound.
Check: The playback sounds clear and stable, with your voice at a comfortable level and no clipping or unintended microphone source.
Common Mistakes to Avoid
- Speaking into the back or wrong side of a directional microphone. — Check the microphone manual or its front-facing indicator, then aim that side toward your mouth.
- Setting gain too high to make the voice louder. — Set a close, steady microphone position first, then raise gain gradually while watching the meter for peaks below 0 dBFS.
- Leaving multiple microphone inputs active. — Select one intended input in the streaming software and mute or remove unused microphone sources.
- Using speakers while monitoring a live microphone. — Use headphones during setup and streaming to prevent the microphone from picking up speaker audio and creating feedback.
Troubleshooting
Problem: The computer or streaming software does not show the microphone.
Solution: Check the cable connections, try a different USB port or known-working cable, and confirm the interface is powered on. Reopen the streaming software after connecting the device, then select it again in the input settings.
Problem: The microphone meter does not move.
Solution: Confirm the correct input is selected and not muted. Raise the microphone or interface gain slightly, check any hardware mute switch, and speak toward the microphone’s active side.
Problem: The voice sounds distorted or the meter reaches the red zone.
Solution: Lower the interface or microphone gain until loud speech stays below 0 dBFS. Record another test, since reducing a fader after clipping does not undo the distortion.
Problem: The voice sounds distant, echoey, or full of room noise.
Solution: Move the microphone closer to your mouth, check that you are speaking toward its active side, and angle it away from noisy equipment. Reduce hard-surface reflections with curtains, rugs, or other soft furnishings.
What Success Looks Like
Your streaming software uses the intended microphone, the input meter responds to your voice, and ordinary speech peaks around -18 to -10 dBFS without reaching 0 dBFS. A test recording should sound clear and even, with no obvious clipping, feedback, strong echo, or unwanted second microphone.
Next Steps
Keep the microphone at the tested distance and mark the stand position if it shifts easily. Before each stream, check the selected input, hardware mute switch, and audio meter with a brief sound check. Recheck gain if you change microphones, interfaces, room layout, or speaking distance. Clean the pop filter and microphone according to the manufacturer’s care instructions.
Frequently Asked Questions
Should I use a USB or XLR studio microphone for streaming?
A USB microphone connects directly to the computer and is a straightforward choice for one-person streaming. An XLR microphone needs an audio interface or mixer, but that setup can provide more input controls and make it easier to connect additional audio equipment. Choose a microphone that fits your existing connections and setup.
How far should a studio microphone be from my mouth?
Start about 10-15 cm (4-6 inches) away, with the microphone slightly off to one side. Adjust the distance if your voice sounds boomy, too quiet, or affected by breath noise, then check levels again.
Do I need phantom power for an XLR microphone?
Only some microphones need phantom power. Check the microphone’s manual or manufacturer specifications before switching on 48 V. Leave it off if the microphone does not require it.
What audio level should I aim for while streaming?
Set normal speech to peak around -18 to -10 dBFS and keep louder phrases below 0 dBFS. Exact meter behavior varies by software, so confirm the setting with a test recording and listen for distortion.
Why can I hear my microphone with a delay?
Monitoring through streaming software can add processing delay. Use direct monitoring on your audio interface if available, or turn off software monitoring when you do not need to hear yourself through the computer.
Fall Picks
fall essentials
As an affiliate, we earn on qualifying purchases.